Transform a Sunny Image into a Rainy Grungy Illustration
Start by downloading this this picture from sxc.hu . This image is great for the task because it already has a wet floor with puddles, which will make the composition more believable
We need to get rid of the yellows, and give the picture a darker, blue-ish look. First, hit Ctrl + U and select the Yellow channel. Bring the saturation down to 0
Then, select Image > Adjustemntsآ > Photo filter and apply the deep emerald filter. Hit ok, then repeat this step and apply the deep blue filter
We got rid of the warm tones, but now let`s give it a more dramatic blue look. We`ll do this by applying a gradient map adjustment layer. Click at the bottom of the layers palette on the half white/half black icon to find the gradient map adjustment layer. I used these blue shades: #003366 at left and #27aae1 at right
Next, we need to even out the contrast a little bit, and we do this by applying a Curves adjustment layer. Place two nodes on the curve like below and drag the upper one slightly downwards
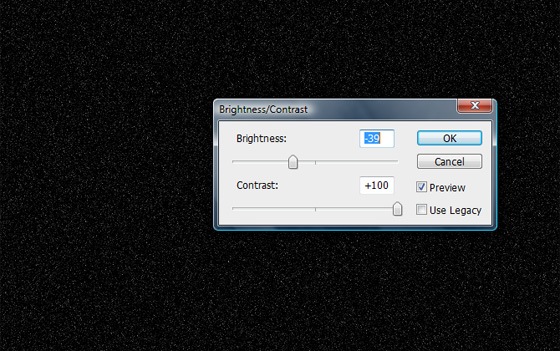
Now let`s make it all darker and more for a rainy weather. Add a Brightness/Contrast adjustment layer and use these settings: -14 for brightness, +65 for contrast
There`s one corner that`s still too bright: the rooftops. Make a triangular selection with the polygonal lasso and, with the selection active, add another Brightness/Contrast adjustment layer. Place this layer right on top of the background layer
Let`s make some rain. At the top of all layers, create a new empty layer. Set you background and foreground colors to black and white (hit D) and then choose Filter > Render > Clouds
Go Filter > Noise > Add noise and use the setting below
The magic happens when we turn the layer`s blending mode from Normal to Soft Light. But that’s not good enough. Make a rectangular marquee in the middle of the image. Then hit Ctrl + J to paste it in a new layer (make sure that you are on the rain layer before doing so). Then, hit Ctrl + T to activate the transform controls
Enlarge the selection to fill the entire screen. This will make the “raindrops†in the foreground look larger. You should also slightly rotate it counterclockwise (-0.7 degrees). Afterwards, let’s sharpen this layer to make the raindrops stand out some more. Use Sharpen > Smart Sharpen and settings like below
Let`s add some light to the streetlamp to make the composition more dramatic. Make a new layer (make it below the rain layers – the two rain layers should stay at the top of the layers stack) and then create a circular selection around the lamp. Hit Ctrl + Alt + D and feather the selection by 100 pixels
Fill the selection with a bright cyan: #00aeef. Deselect, switch the layer`s blending more to Screen, then add a layer mask to this layer (where you filled in the light). We`ll have to make the opaque parts of the lamp more visible. To do this, turn off the visibility of the light layer and select (with the pen tool or the lasso tool, if you wish) the shape of the lamp
Feather the selection by a few pixels (3 to 5). Then, switch on the layer`s visibility, set your foreground color to a light gray (55% gray will do) and click on the thumbnail of the layer mask you have added earlier. Hit Alt + Delete to fill in the mask with the foreground color
Then, make another layer and a smaller circular selection
Feather it by 20 px and fill it with white. Afterward, hold down Alt and drag the mask from the previous layer over the new layer. This will copy the mask from the cyan layer to the white layer
Next, duplicate both light layers and delete the masks on the duplicates. We`ll use them to create the refection of the light on the asphalt. Move the two layers down vertically and transform them to look more horizontal
Then, switch the cyan`s layer opacity to 50% and the blending mode to Lighten. The white reflection “ make it 30%
Merge the two layers Shift to select them both and hit Ctrl + E). Ctrl + click on the layer`s thumbnail to load it as a selection. Next, apply Filter > Distort > Wave and use the settings below
Deselect. Next, hit Ctrl + T to transform the reflection again: turn it 90 degrees and stretch it to look like below
To give it a more illustration feel, click on the topmost layer and hit Ctrl + Alt + Shift + E to make a snapshot of all layers. Sharpen this layer with Smart Sharpen (same settings as before). And you`re done
# بتكبس Ctrl + U لحتى يطلع عندك البوكس يلي فوق .. ومن Edit بتختار Yellow وبتغير قيمة الـ Saturation لـ 100-
# بعد هيك بتروح لـ Image > Adjustemnts > photofilter وبتختار القيم يلي بالصورة
# بتروح لعند الطابة يلي نصها اسود ونصها ابيض وبتختار gradient map وبتعمل التدرج متل الصورة وبتكون الالوان من اليسار 003366 # ومن اليمين 27aae1 #
# من نفس خانات الطابة بتختار Curves وحاول تطبق من الخطوط يلي بالصورة
# هون بعدنا عند الطابة لول بتختار Brightness/Contrast وبالقيم -14 for brightness, +65 for contrast
# اذا في كورنر او زاوية بالصورة يلي عم تطبق عليها بتحددها بشكل مستطيل من قائمة الادوات يلي عالجنب اكيد بتعرفها وبتروح لـ Brightness/Contrast وبتغير قيمة هالمنطقة بس لـ -14 for brightness, 0 for contrast
# بدك تعمل لير جديد فاضي من بوكس الليرات " الايكون تبع هالخيار فوق مع شرح تفاصيل بوكس الليرات " بعدها بتكبس عالـ D لحتى يرجع اعدادت اللون لابيض واسود تلقائي وبتروح لـ Filter > Render > Clouds
# بتروح لـ Go Filter > Noise > Add noise وحسب القيم يلي بالصورة
# من قائمة الفلترز Filter > Blur > Motion blur وحسب القيم يلي بالصورة
# بعد هيك بتغير موود اللير الاخيرة تبع المطر From Normal to Soft Light من بوكس الليرات وبتتأكد انك بعدك ع لير المطر وبتحدد منتصف الصورة وبتعمل Ctrl + J وبعدها Ctrl + T
# بعد هيك بدك تعمل rotate للجزء من edit > transform وبتحدد -0.7 degrees .. بترح لـ filter > sharpen > smart sharpen وحسب القيم بالصورة
# بتعمل لير جديدة بس تحت ليرز الـ 2 تبع المطر وبتحدد منطقة المصباح او الضو اذا كان في بشكل دائر وثم Hit Ctrl + Alt + D and feather the selection by 100 pixels
# بتعبي المنطقة المحددة باللون الازرق السماوي 00aeef # وبتلغي التحديد وبتغير موود الطبقية لـ screen بعدها بتضيف layer mask من بوكس الليرات .. بعد هيك بدنا نعتم الاجزاء الخارجية من المصباح او الضو with the pen tool or the lasso tool وبيكسلز وحجم الاداة انت بتحددو حسب .. طبعا لازم تكون مغلق الـ visibility تبع لير الضو قبل
# بتحدد اللون الامامي بالرمادي الفاتح " سكني " وبتروح للير الماسك يلي ضفتو وبتضغط Alt + Delete لحتى تتعبى الطبقة باللون يلي اخترتو
# بتعمل لير جديد لحتى نضيف متل ضو بقلب المصباح وبتحدد المنطقة بالدائرة بس بحجم اصغر عن الخطوة يلي انعملت فوق
# بتروح للير الماسك وبتضل كابس alt وبتنقلو للير الجديدة متل كأن بيعمل كوبي
btw , فيك تستغني عن هالخطوة بالـ lens flare ع لير جديد كتير اسهل
# بتنسخ ليرز الضو الـ 2 وبتحركهم للارض لنعمل انعكاس وبتعمل تدوير to look more horizontal
# وبتغير الـ شفافية لكل طبقة ..... switch the cyan`s layer opacity to 50% and the blending mode to Lighten. The white reflection “ make it 30%
# ولحتى ندمج اخر طبقتين بتكبس Ctrl + E وبعدها Filter > Distort > Wave and use the settings below
# اخر خطوة hit Ctrl + T to transform the reflection again: turn it 90 degrees
مرسله في
ويلكم كرموش .. موضوع الليرات هلأ بشرحو كتير بسيط !
جربت الاكشنز حلوين خصوصاً الايفكت تبع اكشن Star Bucks
التاني حلو بس البخة الزهرية بتطبق ع فيرجين الوان الصورة ذاتها ! << ليه ؟! حركة بايخة من يلي عملو يوهم العالم انو الصورة بتصير Black & White والبخة الزهرية فوقها


 إرسال هذه الصفحه لصديق!
 لطباعه هذا الموضوع


![[heartpump]](graemlins/heartpump.gif) .. عم اشتغل فيه هلأ
.. عم اشتغل فيه هلأ


![[dance]](graemlins/dance.gif)


![[Razz]](tongue.gif) .. تفضل شرح كامل لصندوق الليرات >>
.. تفضل شرح كامل لصندوق الليرات >> 


![[Confused]](confused.gif)


![[Cool]](cool.gif)

![[eyelove]](graemlins/eyelove.gif)
![[crazy]](graemlins/crazy.gif)
![[rofl]](graemlins/rofl.gif)
![[Big Grin]](biggrin.gif)
![[Frown]](frown.gif) بجنن
بجنن 
![[Smile]](smile.gif) .. موضوع الليرات هلأ بشرحو كتير بسيط !
.. موضوع الليرات هلأ بشرحو كتير بسيط !


